
|
"Unless anyone has a better plan..."
This article requires a properly written walkthrough. |
| |||||
| Chapter 2 The Barge | |||||
| Campaign | The Sacrifice | ||||
| The Sacrifice Chapter Chronology | |||||
| |||||
- "Yo, Captain Bill, can we take this ship?"
- ―Francis
- "Ahhh... dammit... the crows are bringin' the zombies!"
- ―Louis
Strategy
Also see: Tactics
All campaign walkthroughs are done on Normal difficulty in single player, and are meant to give tips on what to do and generally point out things that might otherwise be missed.
There are, of course, a few key things to always remember:
- Stop, look, and listen.
- Being observant might alert you to something nasty ahead of time, like a Witch, Special Infected or Tank, and allow you to prepare yourself.
- Teamwork.
- This cannot be stressed enough. Left 4 Dead is supposed to be a cooperative game. Communicate with your teammates, if you're playing with others, or if you're by yourself with the AI, point out things they might otherwise miss. In all cases, watch out for each other and take care of each other. You are not going to survive the zombie apocalypse by yourself.
- Be ready for anything.
- Don't panic.
Watch out as there are a lot of open areas and Infected can attack from all directions.
Campaign
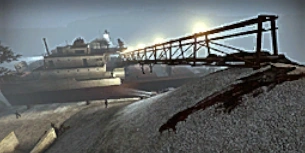
The Barge is the longest chapter in this campaign. It opens in the brick factory safe room. All the Survivor bots will grab shotguns. Once ready, open the exit door and players move through small, dark internal space containing a few Common Infected and a couple of propane tanks.
Bright sunlight streaming in through an open doorway reveals a wide vista taking in a truck loading area containing a couple of semi-trailer rigs, stacks of bricks and numerous passive Common Infected. General tactics here initially involve shooting down individual enemies at a distance. Look for a partially crushed shipping container and note a propane tank and gas can nearby, these can be sniped to dispose of Infected standing within range of their effects. During this time it is almost certain that a Smoker and Hunter plus Horde will spawn. The Horde will normally pile over the chain link fence seen on the right next to the brick factory doorway. (In case of need, players can return to the safe room to restock on ammo.)
Moving forward into the loading area, check out the aforementioned partially crushed shipping container (beware of any Infected found in here) for minor supplies which occasionally spawn inside. Turning right, teams head for an oil tank farm which can be discerned through a gap in its surrounding fence. On approaching this gap, another horde is likely to materialize from in front and from the rear. Once clear, teams enter an area shrouded in mist and containing a shallow pond. Numerous Common Infected are normally loitering around and provide good sniping opportunities for players equipped with Hunting Rifles. A small pumping control station is evident nearby and should be searched for supplies such as throwables. As teams skirt the pond in an anti-clockwise direction, they should be on guard since a Tank may spawn at any moment. (Be careful if he does because he may throw one of the abandoned cars and thereby take out all or most of the Survivors.)
Exiting the tank farm area, teams will notice one of the many amorphous 'industrial' buildings encountered in this chapter. This one is a small truck workshop containing a number of Common Infected and, occasionally a Tank. By leaning into the rear window, a player can quickly set off the explosive barrels found standing up against the far wall and so help clean out this building. Once inside, teams will notice a stairway leading up to the floor above and a hole in the ceiling. On proceeding up the stairs, teams enter the remains of an office with windows overlooking a loading area featuring a multi-bayed gravity feed hopper system to dispense some commodity into semi-trailer rigs. Various numbers of loitering Common Infected will be seen. Snipe them from the office windows, use a pipe bomb and expect a horde attack supported by at least one Hunter, Smoker and Boomer. A Witch can sometimes be found in the vicinity too. Once clear, jump down onto the tanker semi-trailer unit underneath the windows and move forward under and past the gravity hopper structure. Immediately to the left is a small building in front of which are always found supplies and weapons. Note the Explosive Barrels opposite on the right.
Continuing onwards for a short distance brings the team to a road on the opposite side of which is one of the more important buildings in the chapter. Immediately in front is an alarmed car and off to the right is a blocked road bridge and a few passive Common Infected. If a team is moving slowly, one of the many 'hurry up' Hordes will spawn about now, so watch out for that alarmed car!
Teams have a two options at this point. One choice is to press on through the building, collecting what they need from the ammo and supplies that are always found inside. This option is best for teams that are in a hurry. The second alternative is to enter, resupply and then exit by the way they entered, and climb up onto the roof using a ladder set into the wall down the alley way on the building's left (viewed from the vantage point of when this structure is first seen). The ladder brings teams up onto a broad flat roof overlooking a river basin occupied by a half-sunk fishing boat. Excellent sniping can be enjoyed from here of the many Common Infected seen below. In addition, when yet another 'hurry up' Horde spawns it is almost impossible for them to attack players ensconsed on the roof and they can be shot down with ease. Once the basin is clear and it is safe, teams can jump down from the roof onto the nearby shipping containers and thence to the ground. After restocking on ammo, teams proceed to wade across the basin through the water. Beware! A Smoker will invariably spawn near or on the building just vacated and a snagged team member can be difficult to reach quickly since movement through the water is very slow.
After checking the Easter Egg in the form of the St Lidia II fishing boat (the self-same vessel that featured in the Death Toll finale) and dispatching the inevitable Boomer found in the area at this point, teams leave the water and climb up onto a wrecked steel barge half filled with dirt and packed with Common Infected. (If unlucky another Horde will spawn here too.) Proceeding to the stern of the barge, teams jump off and find themselves looking at another anonymous building. This one contains supplies and it is worth entering to secure them. Alternatively the building can be skirted entirely. A Boomer and Hunter is almost certain to spawn and start stalking the team around here. Players will notice Propane bottles and at least one Gas Can in and around this building (check inside the small garage across the street too).
Once again teams are given choices as to where to go next. One course is to head straight on down an inclined road to another truck loading area. The other option is to head across the street and enter the building there. Since this building contains supplies and enemies, if time is not a problem it is a good idea to go in and deal with matters there. A small reception area leads onto a passage containing a number of closed doors. Teams should search these rooms until they arrive in the room at the end of the passage. This one has windown overlooking a truck loading yard featuring a tall gravity feeding system for ore or gravel. Yet again, it is a case of sniping from the windows to clear the area below and fighting off a Horde which will attack from the yard below and from behind (the Infected will smash down the wall to get to the team). Expect this attack to be supported by at least one Smoker and Hunter.
Enter the loading area and inspect the ore hopper. A vertical ladder on the right leads up to a small platform that may be of interest for sniping or refuge purposes. An inclined stairway on the left brings teams up onto a larger platform giving access to ammo, weapons, supplies and a health station containing Pills. A very stiff fight is coming up next, so now is a good time to heal, restock on ammo and switch Tier 2 weapons - if desired.
Once ready, teams now enter the dreaded gravel pile that features so prominently in this campaign's promotional video. Options here are essentially two-fold. Option one is to plug on up the gravel pile, disturb the crows and face a Crescendo Horde that is occasionally reinforced by a Tank. Teams can expect to take heavy damage by the time the curtain comes down on this stanza. (A good idea to battle through and enter the conveyor belt gantry. This forces enemies to attack from only two directions and makes them relatively easy to defeat.) Option two is to avoid the gravel pile entirely and stay on the dock side until teams reach a semi-trailer unit. The Crescendo Horde will spawn (without alerting any crows), but this position forces its members to attack from an arc of less than 180 degrees, making this an easy fight. A few enemies will come under the semi from behind but they should not be a problem.
However the gravel pile battle is fought, once it is over teams head down the conveyor belt gantry to the ore ship alongside the dock. On arriving on deck, turn left and proceed to the stern to collect health and supplies proceeding onto the starboard gangway to collect fresh weapons if wanted. On arriving on the well deck, teams can either jump down the hatchways and fight the Infected lurking there, or they can simply proceed along the deck to the prow, firing oppportunistically down at any enemies seen via the open hatches. A Smoker, Hunter and Boomer plus 'hurry up' Horde should be expected, whilst if it has been a while, teams may even encounter a Tank. From time to time a Witch will be parked up at or near the stem of the ship which is awkward since you will have to engage her in order to quit the ore ship and move on. The self-same location will always provide supplies such as throwables. (Look for a burning red road flare if unsure of which direction to take.)
Looking over the prow of the ore ship will reveal another half-sunk barge filled with dirt and a large number of alert Common Infected. A Hunter will almost always start creeping up too. If available, a Pipe Bomb will even up the odds; especially if the team is running low on ammo, as is sometimes the case at this point. If teams are hurting for health and ammo, let those team members who are in the best shape take point from here on.
Proceed along the barge and jump across onto land again. A small area will contain a significant number of Common Infected but fortunately they are in a choke point and can be taken down with relative ease. If low on ammo, make maximum use of Pistols because there is a probablility of a hard fight coming up. Once the area is clear, take a moment to regather because there is a final bout of heavy combat coming up.
Once ready, the team needs to jump up onto some boxes and look over a wall to see into a parking lot in front of a vehicle repair workshop. Beware that this action will shortly trigger a Horde that will attempt to swarm over the wall to get at the team. Tactics range from pulling back from the wall and potting them as their heads appear over the top of the wall through to standing on the wall or bailing over the wall and meeting them on the other side with melee weapons. (Note that a good sniper can improve the odds by setting off any explosives seen outside the workshop doors just before or during this event.) Health and a grenade will usually be seen on the cab of a pick up truck parked next to the wall.
Once over the wall, proceed into the workshop and look for minor supplies - but do not relax because there could be a supreme challenge coming up very shortly!
If available, have one team member grab a Gas Can and everyone should note any Propane bottles across the road. On exiting the workshop, a few Common Infected will also be spied outside in the street (with an occasional Witch) and over the road is the building containing a loading dock and this chapter's closing safe room. If playing with AI Bots they will usually speed-run across the road, kill any enemies and enter the safe room.
However once in a while a Tank spawns and must be taken down - this is why care should be observed and explosive resources deployed in the street outside. If the Tank does arrive, team members may be low on health and ammo and the outcome can become a distinctly 50:50 proposition for these individuals. Fortunately this is an uncommon phenomenon and most times, teams can sprint to the safe room secure in the knowledge that they have not had to fight this finale at such a disadvantage.
Left 4 Dead 2 Version
The map is unchanged apart from weapon and enemy profiles. Unlike the other Left 4 Dead maps, The Sacrifice was released for Left 4 Dead and Left 4 Dead 2 simultaneously, so there was no time gap between releases for Valve to respond to feedback with map changes.
Versus
The Survivors
In co-op play, a team should favor selecting Assault Rifles. The long and medium ranges in this chapter mitigate against shotguns whilst the Crescendo Event and Hordes work against the Hunting Rifle. Naturally, players should feel free to experiment with different weaponry mixes in a team, but a weighting towards the Assault Rifle will invariably be found to be the most effective in the long run.
All team members should naturally have Dual Pistols.
This chapter features significant numbers of randomly loitering (and spontaneously attacking) individual Common Infected. For this reason, it is easy to run low on Tier 2 ammo if a team does not adopt the good habit of culling them with Dual Pistols.
Faced with the Crescendo Event at the ore pile, players three main options: fight it out on the top of the pile, quickly fall back to the base of the pile (thus creating distance and separation) or move into the conveyor belt gantry (thus creating a tight and deadly, two-way choke point for the Common Infected).
Players should not forget to explore the rear of the stern of the ore ship.
A Smoker and Boomer often spawn on the ore ship upper deck whilst a Witch will usually materialize in the bow area.
Minor supplies will usually spawn topside at the bow of the ore ship.
Unless a team is spoiling for a fight and has good ammo stocks, it is not strictly necessary for a team to go below decks on the ore ship.
Whilst grouped at the bow of the ore ship dealing with enemies in the dredge scow below, players should keep an eye out for a Special Infected sneaking up on them from the rear.
Common Infected will be thickly clustered on the deck of the dredge scow located at the ore ship's bow: to conserve ammo, a grenade is useful here.
The Infected
See also: The Boomer, The Hunter, The Smoker, The Tank
Though they might be immune to the Infection, they aren't immune to death; no one is. Work together to make sure they're victims of this rampant virus, one way or another.
Overall Tips
- Any survivors that choose to run ahead of or fall behind their teammates will be much easier to seriously damage and kill. The farther away they are from their teammates, the more likely they are to be incapacitated or die before their teammates can reach them.
- The Survivors all have outlines around them, showing their status and location. Green means they're healthy. Yellow means they're hurt. Red means they're low on health. Purple means they've been covered in Boomer bile. You can probably discern which to seek out first if possible.
- Think like a Survivor. When you play as one, when are the worst times that something could come at you? Exploit that knowledge.
- Teamwork, as aforementioned. Has a Boomer gotten their bile all over the Survivors? Jump one of them or a clean one. They can't see their teammates' aura until they're clean...and by then, it might be too late.
- As much as teamwork is a strength for you and your enemies, a lack of it will be their downfall. If you can focus all of your energy on killing one of the Survivors, the rest will be that much easier to take down. Not only will they have one less gun, but they will have three Survivors to your three incapacitating Infected.
This level is well-suited for the Charger, due to its long, open areas. As a Hunter, don't go for random pounces unless you are playing in Realism Versus; otherwise, the Survivors just have to shoot in the direction of your silhouette. The Charger really comes into its best moments of effectiveness once the Survivors have passed the boat lying dead in the water. From there, a Charger can wait until the Survivors are all the way across the water, and then charge one of them all the way back. A Spitter can work good, too, if she spits where the Charger takes the Survivor. Also, the street just past the water is a good place to charge, and probably the very best charge spot comes at the hill.
On the hill, the Survivors move at a very slow speed, and if you're lucky, you can charge them down into the water. Smokers can also pull Survivors from the top of the hill. If done properly, you can easily ruin their team's progress and secure an easy win for yourself.
However, if you get a Tank before they start up the hill, you can hide behind the hill and wait until they get to the top, then punch them. A direct hit should send them flying down to the bottom of the hill, damaging them greatly, incapacitating them or killing them outright due to the fall distance, but if you aim for the water, you can kill them instantly. But if they get smart, the Survivors will stay down near the bottom of the hill and put up as much firepower as they can. In that case, do your best to get and hide on the boat―preferably behind the cabin next to the bridge. That way, when they finally come, you can smash them back over the edge and get your sweet revenge.
Easter Eggs
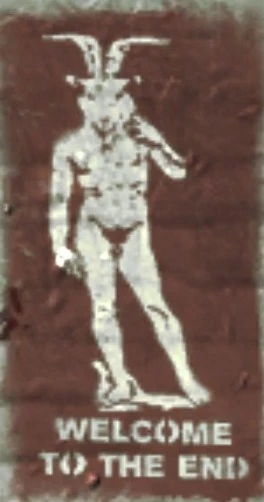
"Welcome to the End" graffiti in the starting safe house
- In the beginning safe room of the level, there is a poster on the wall of a man with a ram's head with the words "Welcome To The End." A reference to the Illumanati and other conspiracy theories.
- When exiting the 2nd warehouse which is near the river, the Slater's fishing boat named St Lidia II from the finale in Death Toll returned in this chapter. Its wrecked condition hints that the Slaters earlier ill-treatment of the Survivors (refer The Sacrifice DLC comic) did not go unrewarded by fate. Francis or Bill can comment when the Survivors intend to use it.
- In the beginning safe-house, a piece of wall graffiti states that "Lou F. turned into one of the BIG ONES!" Given that Tank is conceptually based on the Incredible Hulk, Lou F. would logically refer to Lou Ferrigno, the actor who played The Hulk on the TV series. Additionally, the Tank is voiced by Fred Tatasciore, who is known for voicing The Hulk in most modern media.
Notes
- This is the second campaign of the game to feature a Crescendo Event with crows; the first one being the finale of Blood Harvest. (When players get to the top of the gravel pile next to the ore ship, they startle a mob of crows and so trigger a Horde of Common Infected.)
- A map of this level appears on the safe room wall at the beginning of this chapter. No player navigation route is shown thereon, however.
- This is the only chapter in the game to have safe room graffiti relating to a following chapter, namely: "ALLISON MARK HAS A SAILBOAT READY AT THE BRIDGE MEET US THERE," which is followed up in the chapter-end safe room by:"ALLISON - BRIDGE IS DOWN WE ARE SCREWED". It is possible that the person responsible for these messages also drew the map on the wall for Allison to follow. He may also be the dead guy in the boat in the comic.
- If the above statement is indeed true, Allison and Mark may have left to raise the bridge. It is clear they did not survive.
- A half-sunk fishing boat appearing partway through this level not only resembles that owned by John and Amanda Slater in Boathouse Finale but bears the same name: St Lidia II. Nearby, too, is another fishing boat that is visually identical to the Slater's boat.
- For the first time in Left 4 Dead, crossing water slows players (a normal game play attribute in Left 4 Dead 2.) Elsewhere in Left 4 Dead, players can run at full speed through water in No Mercy and Death Toll; especially in the finale of Death Toll where the water is deep enough to submerge a crouching player.
- This is the only map in Left 4 Dead which has a mandatory Crescendo Event, yet is not playable in Survival Mode.


