*In the starting safe room, some of the floor is flooded by water, as the flood has gotten worse since the Survivors have gone back to the boat after they get the fuel.
*In the starting safe room, some of the floor is flooded by water, as the flood has gotten worse since the Survivors have gone back to the boat after they get the fuel.
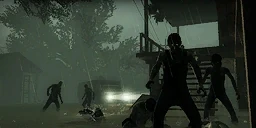
*When you reach the town, you can see that the floodwater has reached through most of the woodwork of the houses and most of the houses are [[File:Hardrain.jpg|thumb|The limited vision due to the storm]] flooded except for the ones that are built higher above the ground.
*When you reach the town, you can see that the floodwater has reached through most of the woodwork of the houses and most of the houses are [[File:Hardrain.jpg|thumb|The limited vision due to the storm]] flooded except for the ones that are built higher above the ground.
+
*There is a glitch where if players leave the first house when they leave the saferoom (or last house when they enter the safehouse if they start from The Milltown), where players can gain double items. This means, if an Ammo upgrade box was in that house, and the player came for it in this chapter, the player who picked it up would recieve the upgrade box, while another one would spawn in the exact location of the original one.
*In the Xbox 360 version, the game audio will come out of the TV, and if you are using headphones then all you would hear are your fellow Survivors and you can communicate with ease.
*In the Xbox 360 version, the game audio will come out of the TV, and if you are using headphones then all you would hear are your fellow Survivors and you can communicate with ease.
*All of the item spawns in this level are transitioned from [[The Milltown]]. This means that weapon spawns will be carried over, along with any throwables, [[First aid kit|medical kits]], defibrillators, ammo packs, pills, or adrenaline shots that were not picked up. Anything that was picked up will not respawn. Dropped items are not carried over. Try to remember where the more valuable item spawns are, especially if you were lucky enough to find laser sights. (However, in versus you can pick up everything and there will still be new items)
*All of the item spawns in this level are transitioned from [[The Milltown]]. This means that weapon spawns will be carried over, along with any throwables, [[First aid kit|medical kits]], defibrillators, ammo packs, pills, or adrenaline shots that were not picked up. Anything that was picked up will not respawn. Dropped items are not carried over. Try to remember where the more valuable item spawns are, especially if you were lucky enough to find laser sights. (However, in versus you can pick up everything and there will still be new items)
Revision as of 22:05, 26 June 2012
"Unless anyone has a better plan..."
This article requires a properly written walkthrough. Please check the proper layout before contributing to the walkthrough.
In Return To Town, the Survivors must make their way back to the boat through a storm-flooded Ducatel in the midst of a hurricane of driving wind and rain.
The Survivors have two main choices as to the route they follow. Firstly, they can take to the rooftops of houses on the right hand side of the street. This has the twin benefits of being faster than wading through the flood water at street level and conferring a natural high-ground combat advantage over the many Common Infected loitering at ground level. Survivors taking this option must, however, be on guard against Special Infected (especially Smokers) who are lurking in ambush. Secondly, players can be more conservative and stay at ground level (perhaps going up onto roofs on an opportunistic basis). Wading through the floodwater and dealing with Infected at the same time is a slow business. Fortunately, the water also slows down the Infected and gives players time to form up to receive their attacks.
On account of the medium and long ranges present in this Chapter, preferred primary weapons will tend towards any of the various classes of rifle; however, individual players must feel free to experiment with different options and settle on those that work best given their teammates and game play experience.
When the hurricane hits with full force (as it does from time to time), microphone chat can be severely affected due to the way the audio channels layer; this is likely an intended effect by Valve in order to maintain an aura of realism. While the microphone can still be used, a player must not assume that team members can hear messages clearly or at all sometimes. This effect is lessened when a co-op team is indoors.
Players begin in the saferoom. If you've already been here before, loot the health closet for a couple of Health kits. Check for leftover supplies from before, such as Pipe bombs, Bile jars and Molotovs. If there's a couple of Pipe bombs or Bile jars, grab one and throw it in the small piece of land outside. This gets rid of most of the Commons around, and if needed, a Molotov as a temporary barrier and to burn them up quickly and efficently. Restock up on ammo and begin to move.
If you've already raided the houses, don't go down there. However, if there's a gun you want, or ammo upgrades left there, go check it. It provides a good shelter aganist a Horde, and forces Smokers to wait at the rooftops for you. Repeat this with the other houses until you reach the porch light, searching for supplies on the way. Rooftops can also be protective, but not as much as inside the building, so use either at your own risk.
Get to the garage area and restock if needed. Use the treehouse, if a storm arrives, to protect you and your team greatly, as with tests, players take less damage at the treehouse when a storm comes in. Get to the next house, always watching for Tank and Witch spawns. Raid the house for leftover supplies, and restock your guns at the house across it. It is highly recommended to be careful from this point on, as there are a lot of cars which can potentially incapitate you and if a Tank has not stormed in yet.
Get to the next house, raiding it for supplies. Get to the second floor, as many players tend to oversee it while coming in. In there, mostly throwables and ammo upgrades are found there. Jump to the playground, and progress as fast as you can before the next horde spawns. If one horde does come in however, hide near the house across the saferoom, crouching under the stairs as the incoming Commons will be forced to do the same, giving you an advantage over them. Get into the saferoom and close it quickly. Now all you need to do is signal Virgil.....
Now that humans are controlling the Special Infected, things can only get harder. However, they can't spawn until you leave the safe room. That doesn't mean that you should let them have a good chance to find just the right spot, though! Hurry up and get your supplies, and get running!
Throughout the level, remember that you are playing against human players. They will not wait for you to come to them, and if they do, it's because they have an ambush location that could be deadly to you and your team. With this in mind, you need to keep moving. However, moving blindly could be your downfall―move quickly, but with caution. Also, under all circumstances, stick close to your team.
This level is relatively short, but you should still stick together. Smokers, Chargers, and Jockeys can easily separate you and your teammates. As with all levels, when you know you're near the safe room, make sure you are with your teammates before you make a dash for it. If you make a break for it alone, it is not unlikely that a Hunter or a Smoker will be waiting for your arrival and possibly kill you before the others can reach you. No one can survive the infection alone. Teamwork is essential.
The Infected
Boomers: Use your surrounding area for camouflage. When the rain falls, it is nearly impossible for the Survivors to see 10 feet in front of them. Hide in houses, behind cars, and on top of buildings for your opponents to walk by, then give them a good vomit. Once you vomit, try to hide and get ready to spew anew. Or, go suicidal and explode all over them. If you can manage to cover at least three Survivors with vomit, try teaming up with another teammate and let them attack the only Survivor with vision. If there is a Witch, hide in front of her. If one foolish Survivor pops you, they also startle the Witch behind you!
Smokers: The roofs are your best friend. If all the Survivors are on the roofs, try to pull one off. This will force a teammate to either jump down or try shooting you from the roof. This will slow that one Survivor down, making them a perfect pray for one of your teammates to attack! If most of the Survivors are on the ground, try ensnaring them from atop the roofs. The rain will make it difficult to see, causing a perfect attack. And don't forget, teamwork.
Hunters: Again, roofs are your best friends! Throughout the level, there are many tall houses, use them to pounce from. The greater the distance you pounce, the more damage dealt (25 damage the most). Try to attack the lone Survivors, for it will take a while for the Survivors to get to them due to the flood. If a teammate has a Survivor in their clutches, wait for their teammate to come help, then pounce!
Jockeys: Drag Survivors away from their teammates! Make them waste as much time as possible for your teammates to attack/spawn. Dragging them around houses and inside them can waste a lot of time. Remember, always try to ride them backwards, never forwards. This will get the enemy team more points, and make them rush ahead to try to save their teammate.
Chargers: The best thing to do is to try to separate them from the team. When inside the hallways of the houses, a perfect charge could ram all of the opponents at one time! Charging them off roofs could also cause some fall damage if high enough. And, of course, teamwork is always the best thing to use.
Spitters: When there are Survivors in the houses, a nice spit in a closed area can cause a lot of damage. If a foolish Survivor crawls inside the ambulance, a spit inside could render them useless because they are crouched and will move slowly through the spit. Spitting in front of the Survivors is also a good idea. If they cannot go around it, they will have to wait for the spit to disappear, unless they are stupid enough to run through it. As always, when there are incapacitated Survivors, spit on them!
Tanks: If you happen to be the tank, rush in and attack! If the Survivors are on the street, hitting one of them with a car will instantly incapacitate them. Don't be afraid of molotovs, the flood and rain will make little use of them, as it will also put out the flames on you. Remember to keep an eye on the pressure meter, stay with the Survivors and keep them nervous, and get a couple of good punches in there too.
Notes
If you get incapacitated inside of the speedboat halfway through the level, and the AI come to save you, they won't be able to exit the rims of the speedboat. This is probably because the developers didn't code the rims of the speedboat to tell the AI to jump over them, but sometimes the bots will teleport to your location if you get far enough away.
In the starting safe room, some of the floor is flooded by water, as the flood has gotten worse since the Survivors have gone back to the boat after they get the fuel.
When you reach the town, you can see that the floodwater has reached through most of the woodwork of the houses and most of the houses are
The limited vision due to the storm
flooded except for the ones that are built higher above the ground.
There is a glitch where if players leave the first house when they leave the saferoom (or last house when they enter the safehouse if they start from The Milltown), where players can gain double items. This means, if an Ammo upgrade box was in that house, and the player came for it in this chapter, the player who picked it up would recieve the upgrade box, while another one would spawn in the exact location of the original one.
In the Xbox 360 version, the game audio will come out of the TV, and if you are using headphones then all you would hear are your fellow Survivors and you can communicate with ease.
All of the item spawns in this level are transitioned from The Milltown. This means that weapon spawns will be carried over, along with any throwables, medical kits, defibrillators, ammo packs, pills, or adrenaline shots that were not picked up. Anything that was picked up will not respawn. Dropped items are not carried over. Try to remember where the more valuable item spawns are, especially if you were lucky enough to find laser sights. (However, in versus you can pick up everything and there will still be new items)
Regardless of difficulty, the Director will always make sure there are at least two med kits in the safe rooms. Rarely the Director will add three or even four health kits.
The safe room at the end of this map is the only one in the entire game that is always closed when you approach it. This is due to the house acting as the safe room having its doors and windows boarded up and safe room doors are revealed after the storm blows the plywood off.
The safe room doors in this level swap places. This may be because every safe room on every level has the barred door as the exit to the next level, and the solid door as the entrance to the room.
There is a space between the table and boxes in the starting safe room whereby if the player jumps in between that space holding crouch and then releasing at the right time, they will hear their character's scream and sustain fall damage or even die instantly.


