No edit summary Tags: Visual edit apiedit |
m (This is mostly a rewrite of what was already here. Usually I like succinct sentences, but considering how short this article is anyway, we can go a little more in-depth in the writing.) Tag: sourceedit |
||
| Line 14: | Line 14: | ||
[[The Survivors]] start off in the back of the [[Rescue Vehicles#Runway Finale|C-130 Airplane]] that they boarded at the end of [[Dead Air]]. |
[[The Survivors]] start off in the back of the [[Rescue Vehicles#Runway Finale|C-130 Airplane]] that they boarded at the end of [[Dead Air]]. |
||
| + | In order to make it to safety, the Survivors must traverse their way through the airfield and the various hangars before reaching an orchard. The orchard is wide open and full of [[the Infected]]. |
||
| − | The Survivors leave the downed aircraft and make their way out of the airfield, through an adjoining apple orchard to a rail bridge spanning a shallow river. From there, they enter a stretch of open farmland to face an endless horde hindering their progress toward a safe room upstairs in a two-story farmhouse. |
||
| + | |||
| + | After making it through the orchard, the Survivors make their way alongside a river and briefly follow some raised train tracks before reaching the next [[safe room]] inside a farmhouse. |
||
==[[Strategy]]== |
==[[Strategy]]== |
||
| Line 54: | Line 56: | ||
==Behind the Scenes== |
==Behind the Scenes== |
||
| − | The Survivors start in the back of the C-130 Airplane from [[Dead Air]] because this campaign was originally supposed to bridge that campaign with [[Blood Harvest]]. |
+ | The Survivors start in the back of the C-130 Airplane from [[Dead Air]] because this campaign was originally supposed to bridge that campaign with [[Blood Harvest]]. Despite this, there's no indication as to what happened to the pilot himself. |
| − | + | Additionally, the Infected were originally supposed to crawl through the thick orchard, as noted by the developers who listed it as a glitch that they do not currently do so. This would create a special area in which all [[Common Infected]] would move similarly to a [[Uncommon_Infected#Mud_Men|mud man]] from the ''[[Left 4 Dead 2]]'' campaign, [[Swamp Fever]]. |
|
== Notes == |
== Notes == |
||
| − | * |
+ | * The [[Crescendo Event]] takes place in open ground in front of the first [[safe room]] at the end of the level. It isn't triggered by anything other than players entering the area and leaves no explanation as to why a [[horde]] spawns to attack here. |
| − | * [[Weapons|Tier two weapons]] can be found |
+ | * [[Weapons|Tier two weapons]] can be found all across the map, including within a few feet of the first starting point. They are often spawned as lone weapons, such as a single [[Assault Rifle]]. |
* As with the other levels in [[Dam It]], multiple [[The Tank|Tanks]] can spawn on this level. |
* As with the other levels in [[Dam It]], multiple [[The Tank|Tanks]] can spawn on this level. |
||
Revision as of 18:09, 17 December 2016

| |||||
| Chapter 1 Orchard | |||||
| Campaign | Dam It | ||||
| Dam It Chapter Chronology | |||||
| |||||
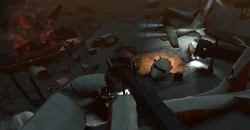
- "The C-130 Landed in small rural airstrip, avoided planes on the runway and plowed through some buildings"
- ―Turtle Rock Studios Development Notes
Orchard is the first chapter of the Dam It campaign.
The Survivors start off in the back of the C-130 Airplane that they boarded at the end of Dead Air.
In order to make it to safety, the Survivors must traverse their way through the airfield and the various hangars before reaching an orchard. The orchard is wide open and full of the Infected.
After making it through the orchard, the Survivors make their way alongside a river and briefly follow some raised train tracks before reaching the next safe room inside a farmhouse.
Strategy
Also see: Tactics
All campaign walkthroughs are done on Normal difficulty in single player, and are meant to give tips on what to do and generally point out things that might otherwise be missed.
There are, of course, a few key things to always remember:
- Stop, look, and listen.
- Being observant might alert you to something nasty ahead of time, like a Witch, Special Infected or Tank, and allow you to prepare yourself.
- Teamwork.
- This cannot be stressed enough. Left 4 Dead is supposed to be a cooperative game. Communicate with your teammates, if you're playing with others, or if you're by yourself with the AI, point out things they might otherwise miss. In all cases, watch out for each other and take care of each other. You are not going to survive the zombie apocalypse by yourself.
- Be ready for anything.
- Don't panic.
Making your way through the Orchard won't be easy. Sight lines are poor, and Infected can come running at you from all sides. Stick together, watch each other's backs, and you'll make it through.
Campaign
At the beginning, the Bot Survivors will grab:
- Bill will grab a Pump Shotgun.
- Francis will grab a Pump Shotgun.
- Louis will grab a Submachine Gun.
- Zoey will grab a Submachine Gun.
Versus
The Survivors
Now that humans are controlling the Special Infected, things can only get harder. However, they can't spawn until you leave the safe room. That doesn't mean that you should let them have a good chance to find just the right spot, though! Hurry up and get your supplies, and get running!
Throughout the level, remember that you are playing against human players. They will not wait for you to come to them, and if they do, it's because they have an ambush location that could be deadly to you and your team. With this in mind, you need to keep moving. However, moving blindly could be your downfall. Move quickly, but with caution. Also, under all circumstances: stick close to your team.
Remember that in Versus, your melee is limited so you cannot properly use corner melee-spamming tactics. However, having the entire team together will be helpful as you can generally see the Special Infected and you'll be able to kill most of them before they reach you. Other than in the orchard itself, you can see quite far, so avoiding Boomers shouldn't be a problem, provided you don't get split up and bogged down in the orchard.
In the orchard itself, the Smokers and the Boomers are your primary concern. A Smoker can split up the team without anyone spotting him and it's fairly easy for a Boomer to sneak up on teams by hiding in the bushes and trees.
Remain vigilant for the Witch's cries. If you spot a Boomer not moving in the distance and staring you down while the Witch can be heard ― don't shoot! If he moves away or towards you, then you can safely assume he's not concealing a Witch. Witches, although avoidable, can be the fatal blow to the Survivors especially if there are competent Special Infected lying in wait.
As with all levels, when you know you're near the safe room, make sure you are with your teammates before you make a dash for it. If you make a break for it alone, it is not unlikely that a Hunter or a Smoker will be waiting for your arrival and possibly kill you before the others can reach you. No one can survive the infection alone. Teamwork is essential.
The Infected
See also: The Boomer, The Hunter, The Smoker, The Tank
They've survived an airplane crash, but you can bet they're shaken up. Now's the time. Work together to make sure they're victims of this rampant virus, one way or another.
Overall Tips
- Any survivors that choose to run ahead of or fall behind their teammates will be much easier to seriously damage and kill. The farther away they are from their teammates, the more likely they are to be incapacitated or die before their teammates can reach them.
- The Survivors all have outlines around them, showing their status and location. Green means they're healthy. Yellow means they're hurt. Red means they're low on health. Purple means they've been covered in Boomer bile. You can probably discern which to seek out first if possible.
- Think like a Survivor. When you play as one, when are the worst times that something could come at you? Exploit that knowledge.
- Teamwork, as aforementioned. Has a Boomer gotten their bile all over the Survivors? Jump one of them or a clean one. They can't see their teammates' aura until they're clean...and by then, it might be too late.
- As much as teamwork is a strength for you and your enemies, a lack of it will be their downfall. If you can focus all of your energy on killing one of the Survivors, the rest will be that much easier to take down. Not only will they have one less gun, but they will have three Survivors to your three incapacitating Infected.
Boomers:
Hunters:
Smokers:
Tanks:
Witches:
Behind the Scenes
The Survivors start in the back of the C-130 Airplane from Dead Air because this campaign was originally supposed to bridge that campaign with Blood Harvest. Despite this, there's no indication as to what happened to the pilot himself.
Additionally, the Infected were originally supposed to crawl through the thick orchard, as noted by the developers who listed it as a glitch that they do not currently do so. This would create a special area in which all Common Infected would move similarly to a mud man from the Left 4 Dead 2 campaign, Swamp Fever.
Notes
- The Crescendo Event takes place in open ground in front of the first safe room at the end of the level. It isn't triggered by anything other than players entering the area and leaves no explanation as to why a horde spawns to attack here.
- Tier two weapons can be found all across the map, including within a few feet of the first starting point. They are often spawned as lone weapons, such as a single Assault Rifle.
- As with the other levels in Dam It, multiple Tanks can spawn on this level.


